
Previously, we looked at WordPress page caching using a content delivery network (CDN). This is an essential tool for speeding up a WordPress site at a global scale. That said, it’s still not commonly used by a lot of WordPress hosts.
With Ymir, you get a CloudFront (Amazon’s CDN) distribution set up to do page caching on production environments by default. This is a great feature of the product. But what if you want to configure CloudFront to do page caching yourself?
Well, this isn’t talked a lot about. In my research, the only article I found was this one on an AWS blog. This article will use that article as a baseline, but will discuss in more detail how to set up CloudFront.
You don’t need to host your WordPress site on AWS
Before we begin, it’s worth nothing that to do this you don’t need to host your site on AWS. This is another problem with AWS article. It only shows you how to do it if you use S3 for assets and an EC2, elastic load balancer or a lightsail instance.
While Ymir only supports AWS, this article won’t use a WordPress site hosted on it. Instead, we’ll use a WordPress site configured on DigitalOcean with Sail. But you could use a WordPress site hosted anywhere.
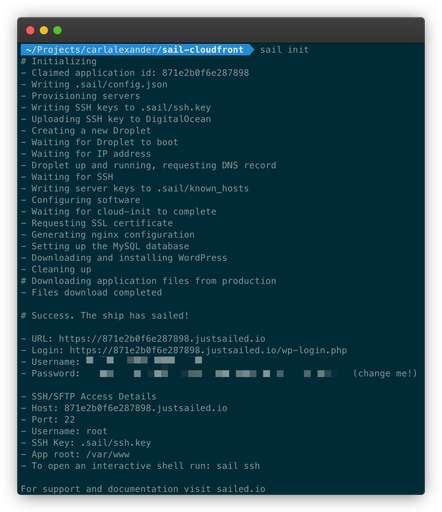
One handy reason to use Sail is that it comes with a vanity URL. (Something Ymir does as well!) So there’s no need to mess with any DNS configuration for the WordPress server. We’ll still need to add a domain name to use with CloudFront, but it simplifies things a bit!
Architecture overview
For this article, we’re going to keep the architecture simple. It’ll be similar to what the AWS article does. Here’s what it’ll look like.
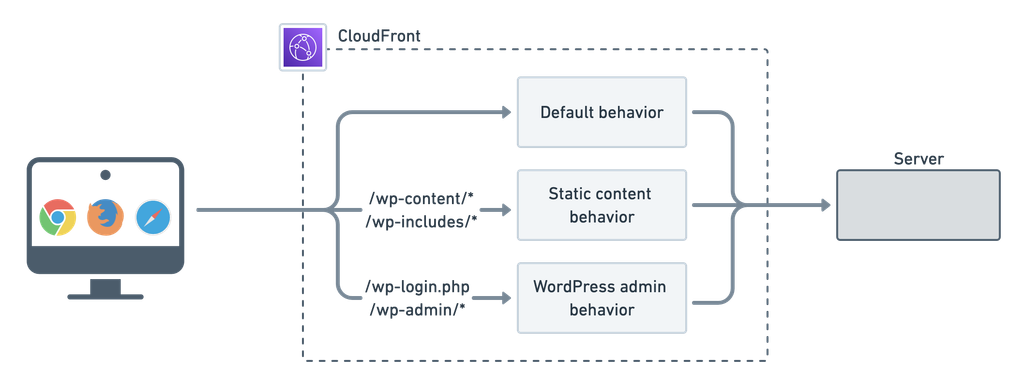
As you can see in the above diagram, we’re going to use CloudFront to cache static WordPress assets on top of HTML. These are any files found in /wp-content and /wp-includes. This is also what the AWS article does.
The big difference is that we’re not using AWS services like S3 to store static assets. (Something Ymir manages automatically for you each time you deploy.) Instead, we’re going to use the same origin for both regular content and static assets. We’ll go over what an origin and other CloudFront terminology when we configure CloudFront next.
Creating a distribution
The first step is to go to the CloudFront console and create a distribution.

A CloudFront distribution is the entity representing our configured CloudFront CDN with its origins and cache behaviours. To create a distribution, just click the Create distribution button in CloudFront console, as shown above. This will bring up the distribution creation page.
It’s quite big! So we’re going to go through each section and explain what we’re trying to do.
Configuring the origin
The first thing you have to configure when creating a CloudFront distribution is the origin. An origin is a location where CloudFront can go get the original version of a piece of content that it’ll cache.
While the distribution creation page only lets you configure one origin, you can have more than one. That said, for this article, we’ll only need one. For the Origin domain, we enter the vanity domain of the droplet that Sail configured for us.
Once you enter a domain name, you’ll see the origin options change. You’ll have to make a few changes to the default origin configuration. You can see the full configuration below.
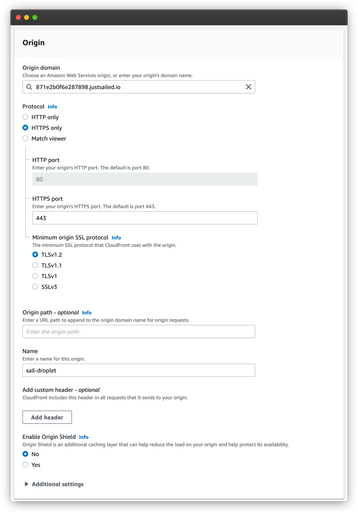
First, you’ll want to change the Protocol to HTTPS only since Sail configures our droplet with a Let’s Encrypt SSL certificate.
Next, it’s a good idea to bump up the Minimum origin SSL protocol. That’s because anything other than TLSv1.2 is deprecated. So that’s why I change it to that.
The last small change is optional. By default, AWS will use the domain name as the name of the origin. I change it to sail-droplet.
Configuring the default behavior
The next part of distribution creation form centers on configuring the default cache behavior. A cache behavior defines how CloudFront will cache content. Here we’re defining the default caching behavior, but we’ll configure another one for static assets later.

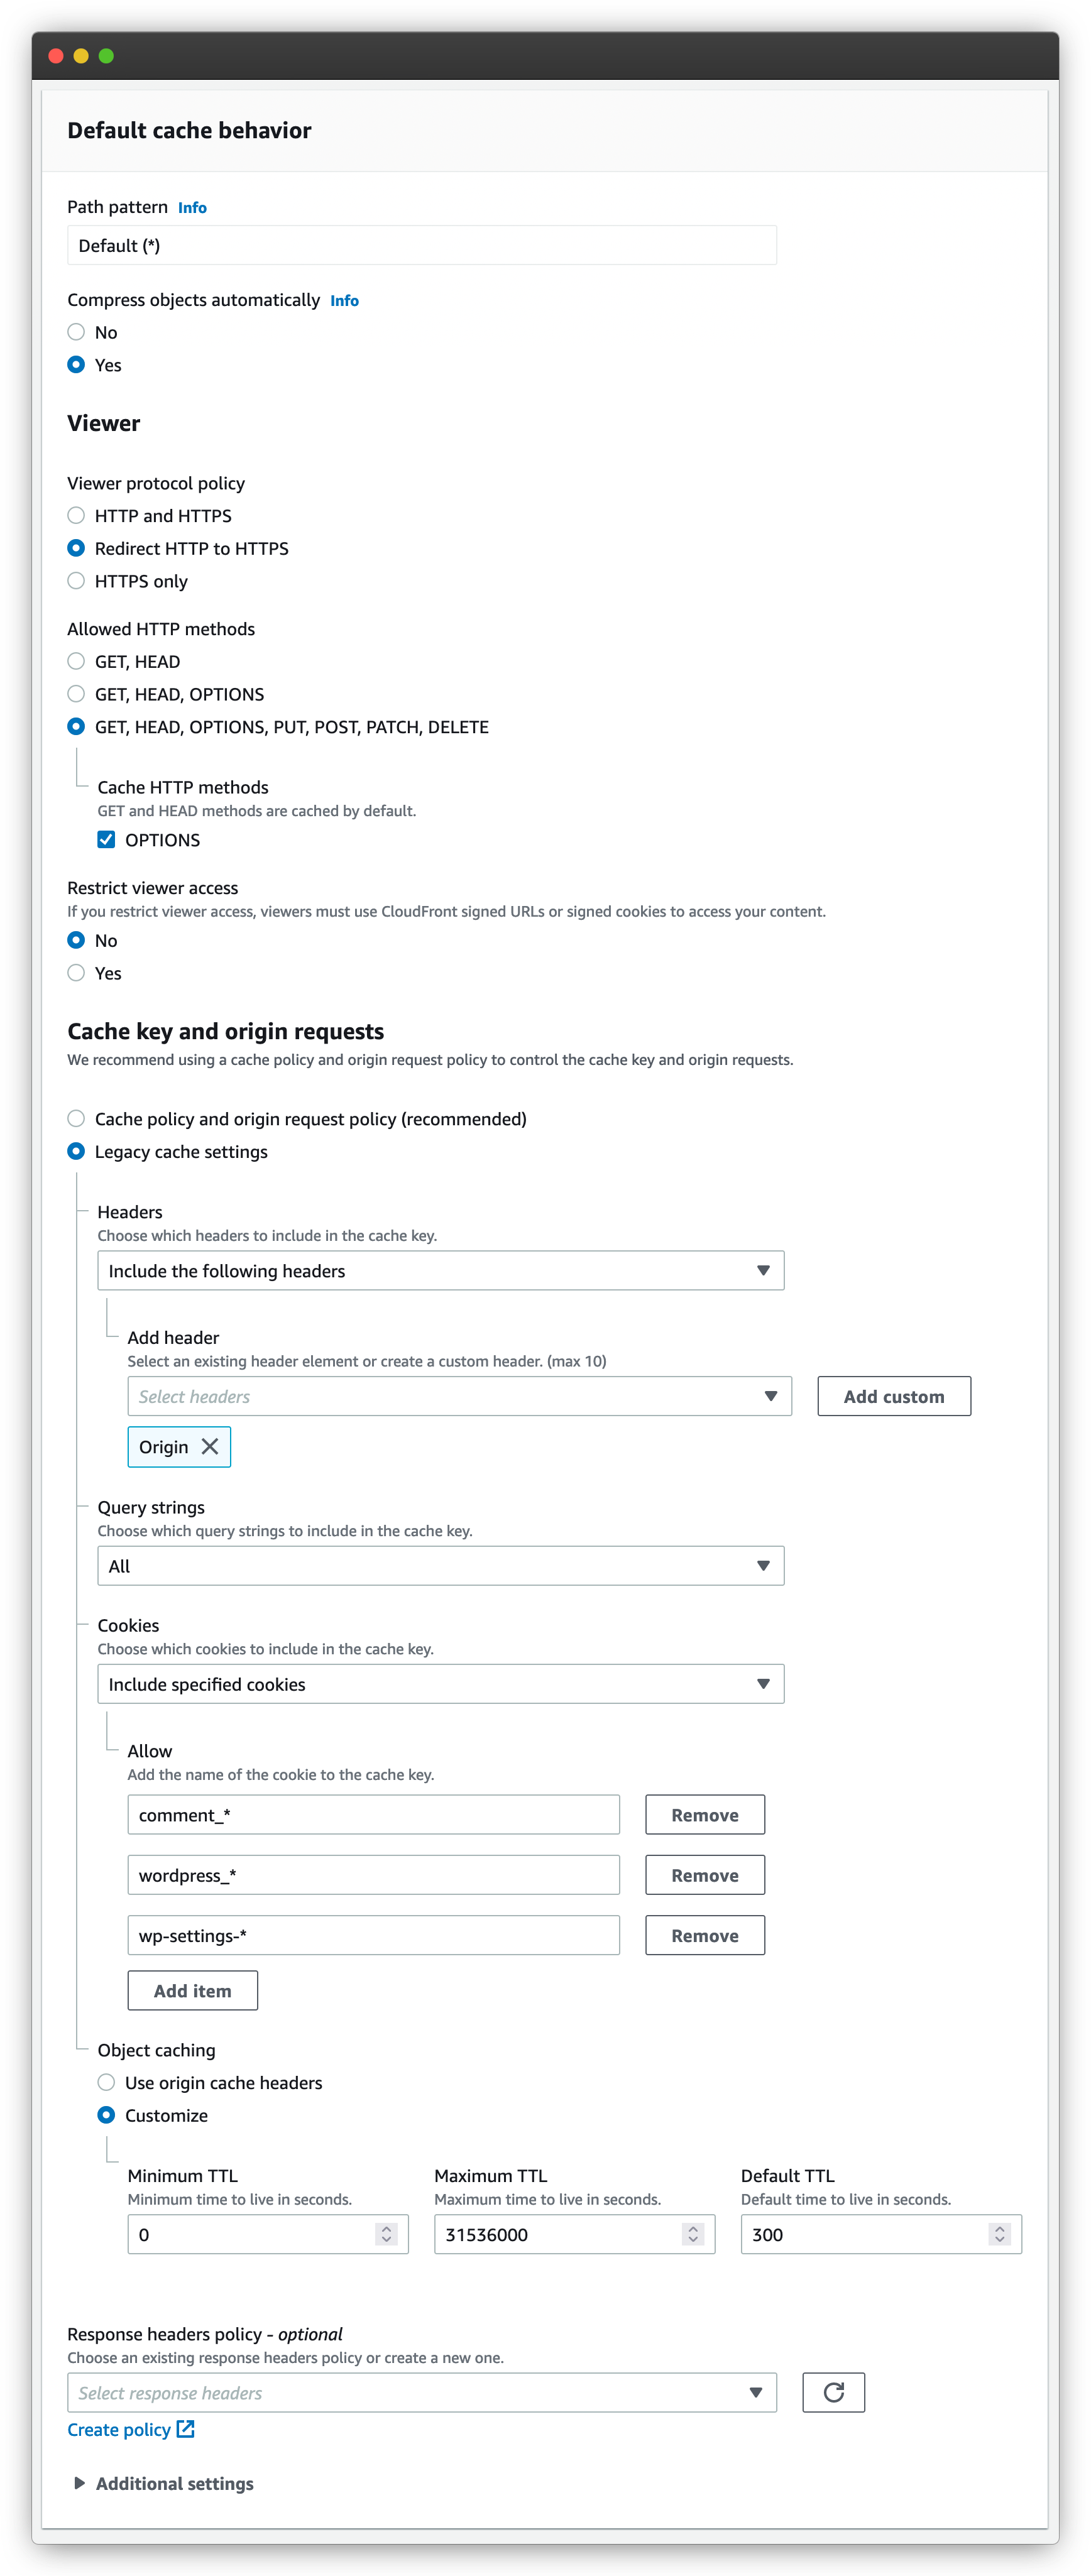
Above is the default behavior configuration. It’s pretty massive! That said, a lot of it will make sense as we go through it.
The first setting relates to whether CloudFront will compress anything it caches if it can. This great to have! The default is to have that on, so there’s nothing to change.
For Viewer protocol policy, you want to configure it to do HTTP-to-HTTPS redirection for you. Your WordPress site can do that, but it’ll be faster if you have CloudFront handle it.
Next is Allowed HTTP methods. This is an important configuration option because it tells which HTTP methods CloudFront will handle. We want it to handle all HTTP methods, but it’ll only cache GET and HEAD methods. We also added the OPTIONS which is optional.
Cache key
Finally, we want to configure how CloudFront caches content. We do this in the Cache key and origin requests section. The standard way to do this now is to use a cache policy, but, to keep things simple, we’re going to use the legacy cache settings.
Now, how CloudFront generates a cache key is the most important configuration element of a cache behavior. (That’s why it gets its own section!) That’s because this cache key determines if CloudFront will return a cached response or not. You want it to be as generic as possible so that you hit a cache key as often as possible. But you also need to keep the elements that make a WordPress site dynamic.
First, we want to decide which HTTP header to use in your cache key. The only one we want is Origin, which we want for security reasons.
Next, we need to choose which query string values to use for the cache key. WordPress uses query strings pretty extensively. So we’re going to use them all for our cache keys.
Finally, we have cookies. We don’t want to create cache keys using all cookies. Instead, we want to limit it to WordPress cookies. The good thing is that CloudFront supports wildcards in the cookie name, so we don’t have to list them all.
By default, the three WordPress cookies prefixes you want to use for your cache key are:
comment_*wordpress_*wp-settings-*
This list will be different depending on the plugins you use. It’s not any different from what you’d exclude with a page caching plugin. You need to exclude all plugin cookies your site needs.
At the end of this, you want to decide how long CloudFront will keep things cached for. By default, we set it to 300 seconds or 5 minutes. This strikes the right balance between keeping things cached for performance, but still keeping things dynamic.
Setting
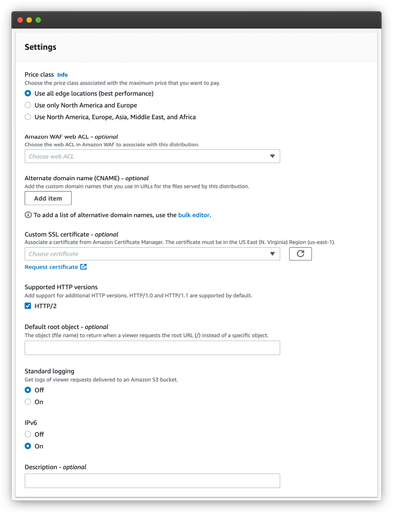
The last section of distribution creation form groups miscellaneous settings. You’ll find a screenshot below, but we want to keep all the default values for now. We’ll revisit some of them later in the article.
Adding additional cache behaviors
Once you press on Create distribution, you’ll go back to the page describing the new distribution. It’s worth noting that it can take up to 20 minutes for AWS to create or update a distribution. So please keep that in mind as we make some changes to it.
On that page, you want to go to the Behaviors tab. This is where we’re going to define additional cache behaviors besides our default one. To begin, click on Create behavior.
Caching static assets
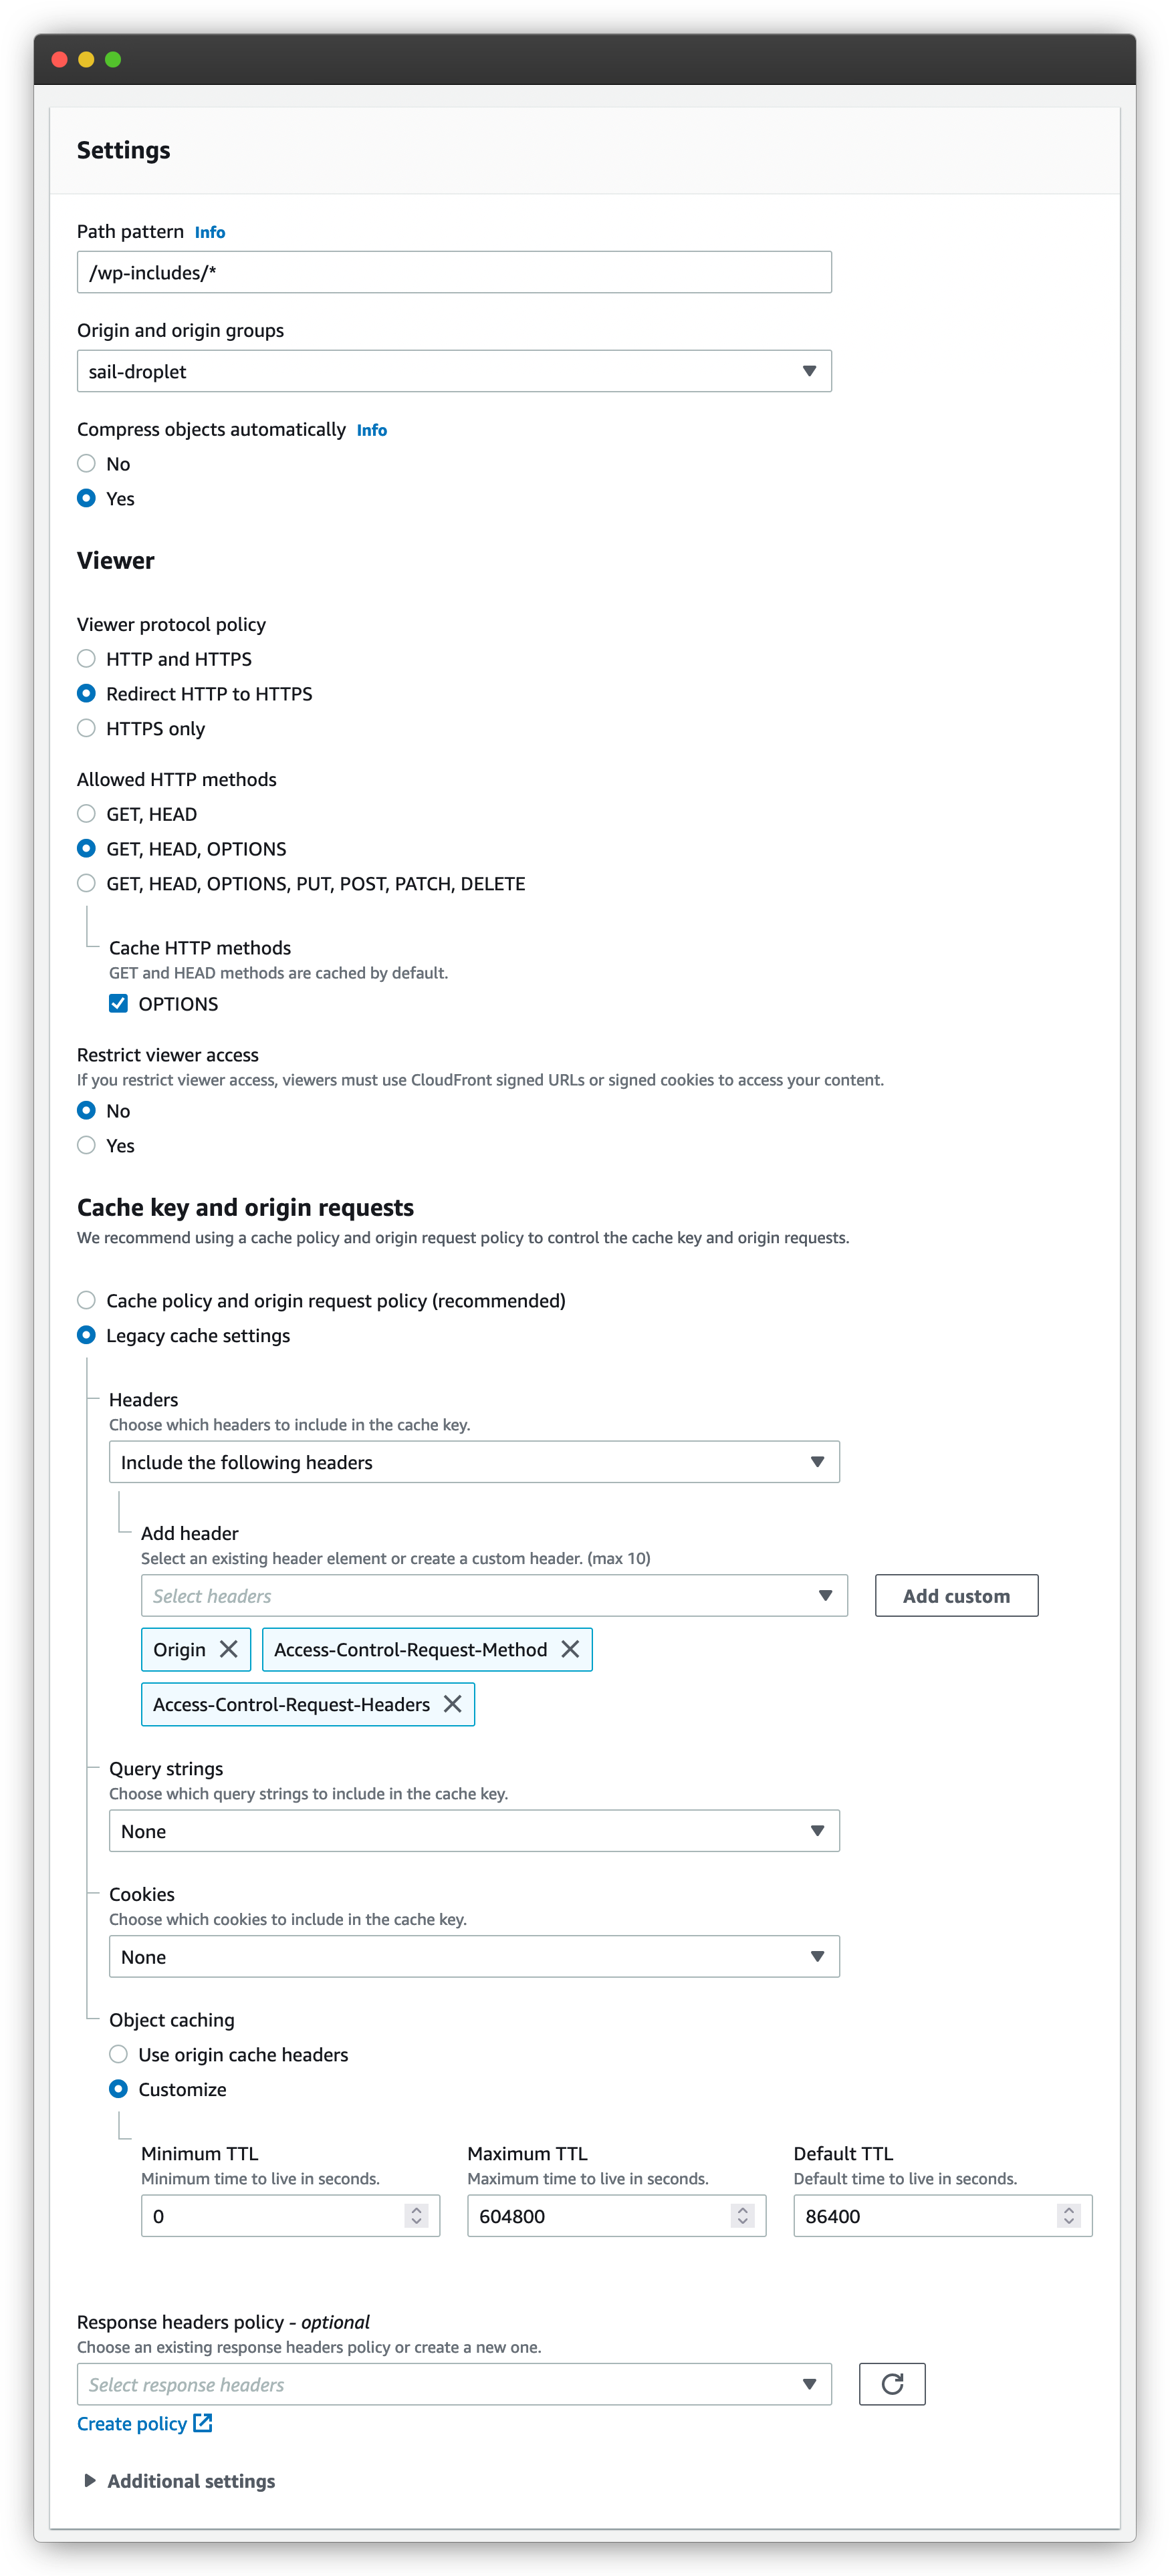
First, we’re going to create behaviors for static assets. This process is a bit tedious because we have to do it for each path that we want to do. Below is the configuration for /wp-includes/*.
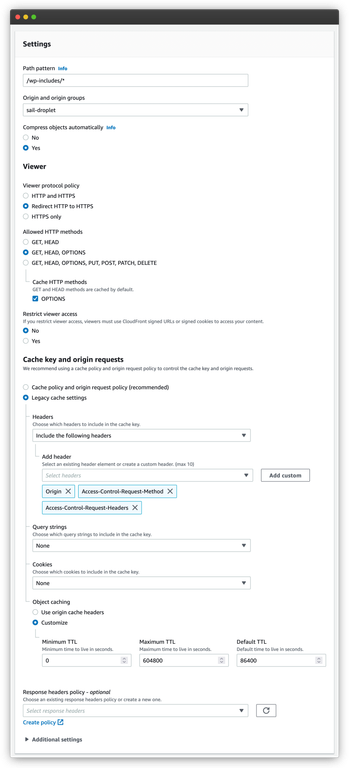
We’re going to focus on the settings that differ from the default cache behavior. But first, make sure that you select sail-droplet as the origin. Or if you named your origin something else, find the origin with that name.
Moving on from that. The first thing that’s different in our settings is the Allowed HTTP methods. We only want to allow GET, HEAD, OPTIONS HTTP methods, since we’re only dealing with assets.
The next set of differences are around the cache key. We still want to use headers to generate the cache key. That said, we’re going to add two more: Access-Control-Request-Headers and Access-Control-Request-Method.
But for the rest, we’re going to disable everything. So we won’t use any query string for cache keys. We also won’t use any cookies either. This will ensure that CloudFront aggressively caches our static assets.
And since we want to aggressively cache these assets, we’re going to change the how long they stay cached. The new default is 86400 seconds, which is a day. The maximum is 604800 seconds or a week.
You can adjust this however you see fit. But this is a pretty good baseline. You then want to repeat the process to create a cache behavior for /wp-content/*. This is where using a cache policy can make sense.
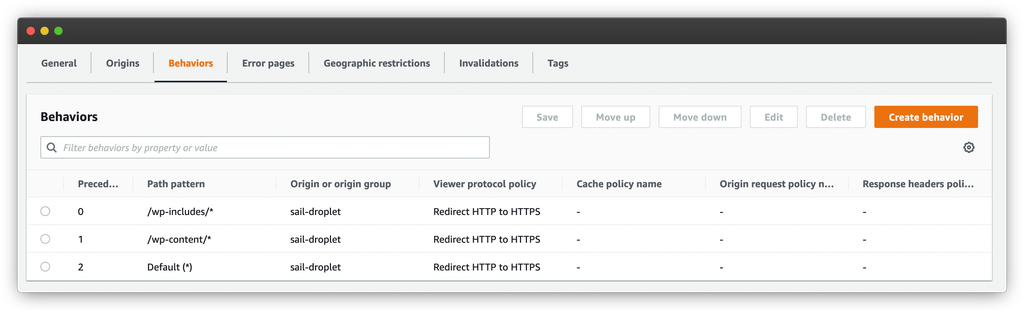
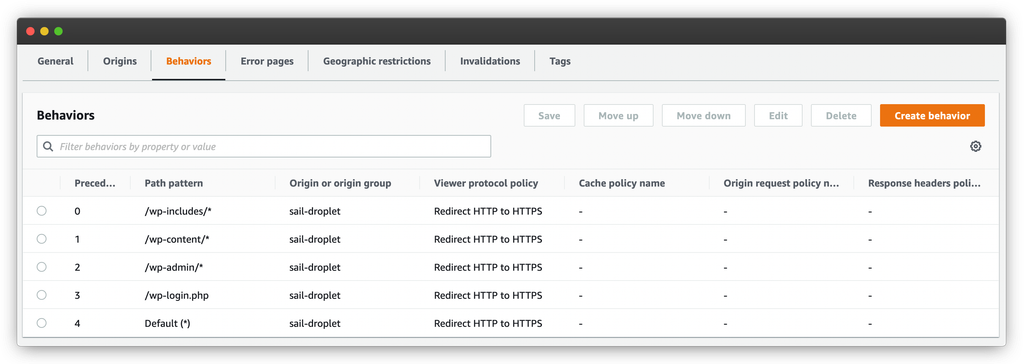
After you’re done, you should have something like this:
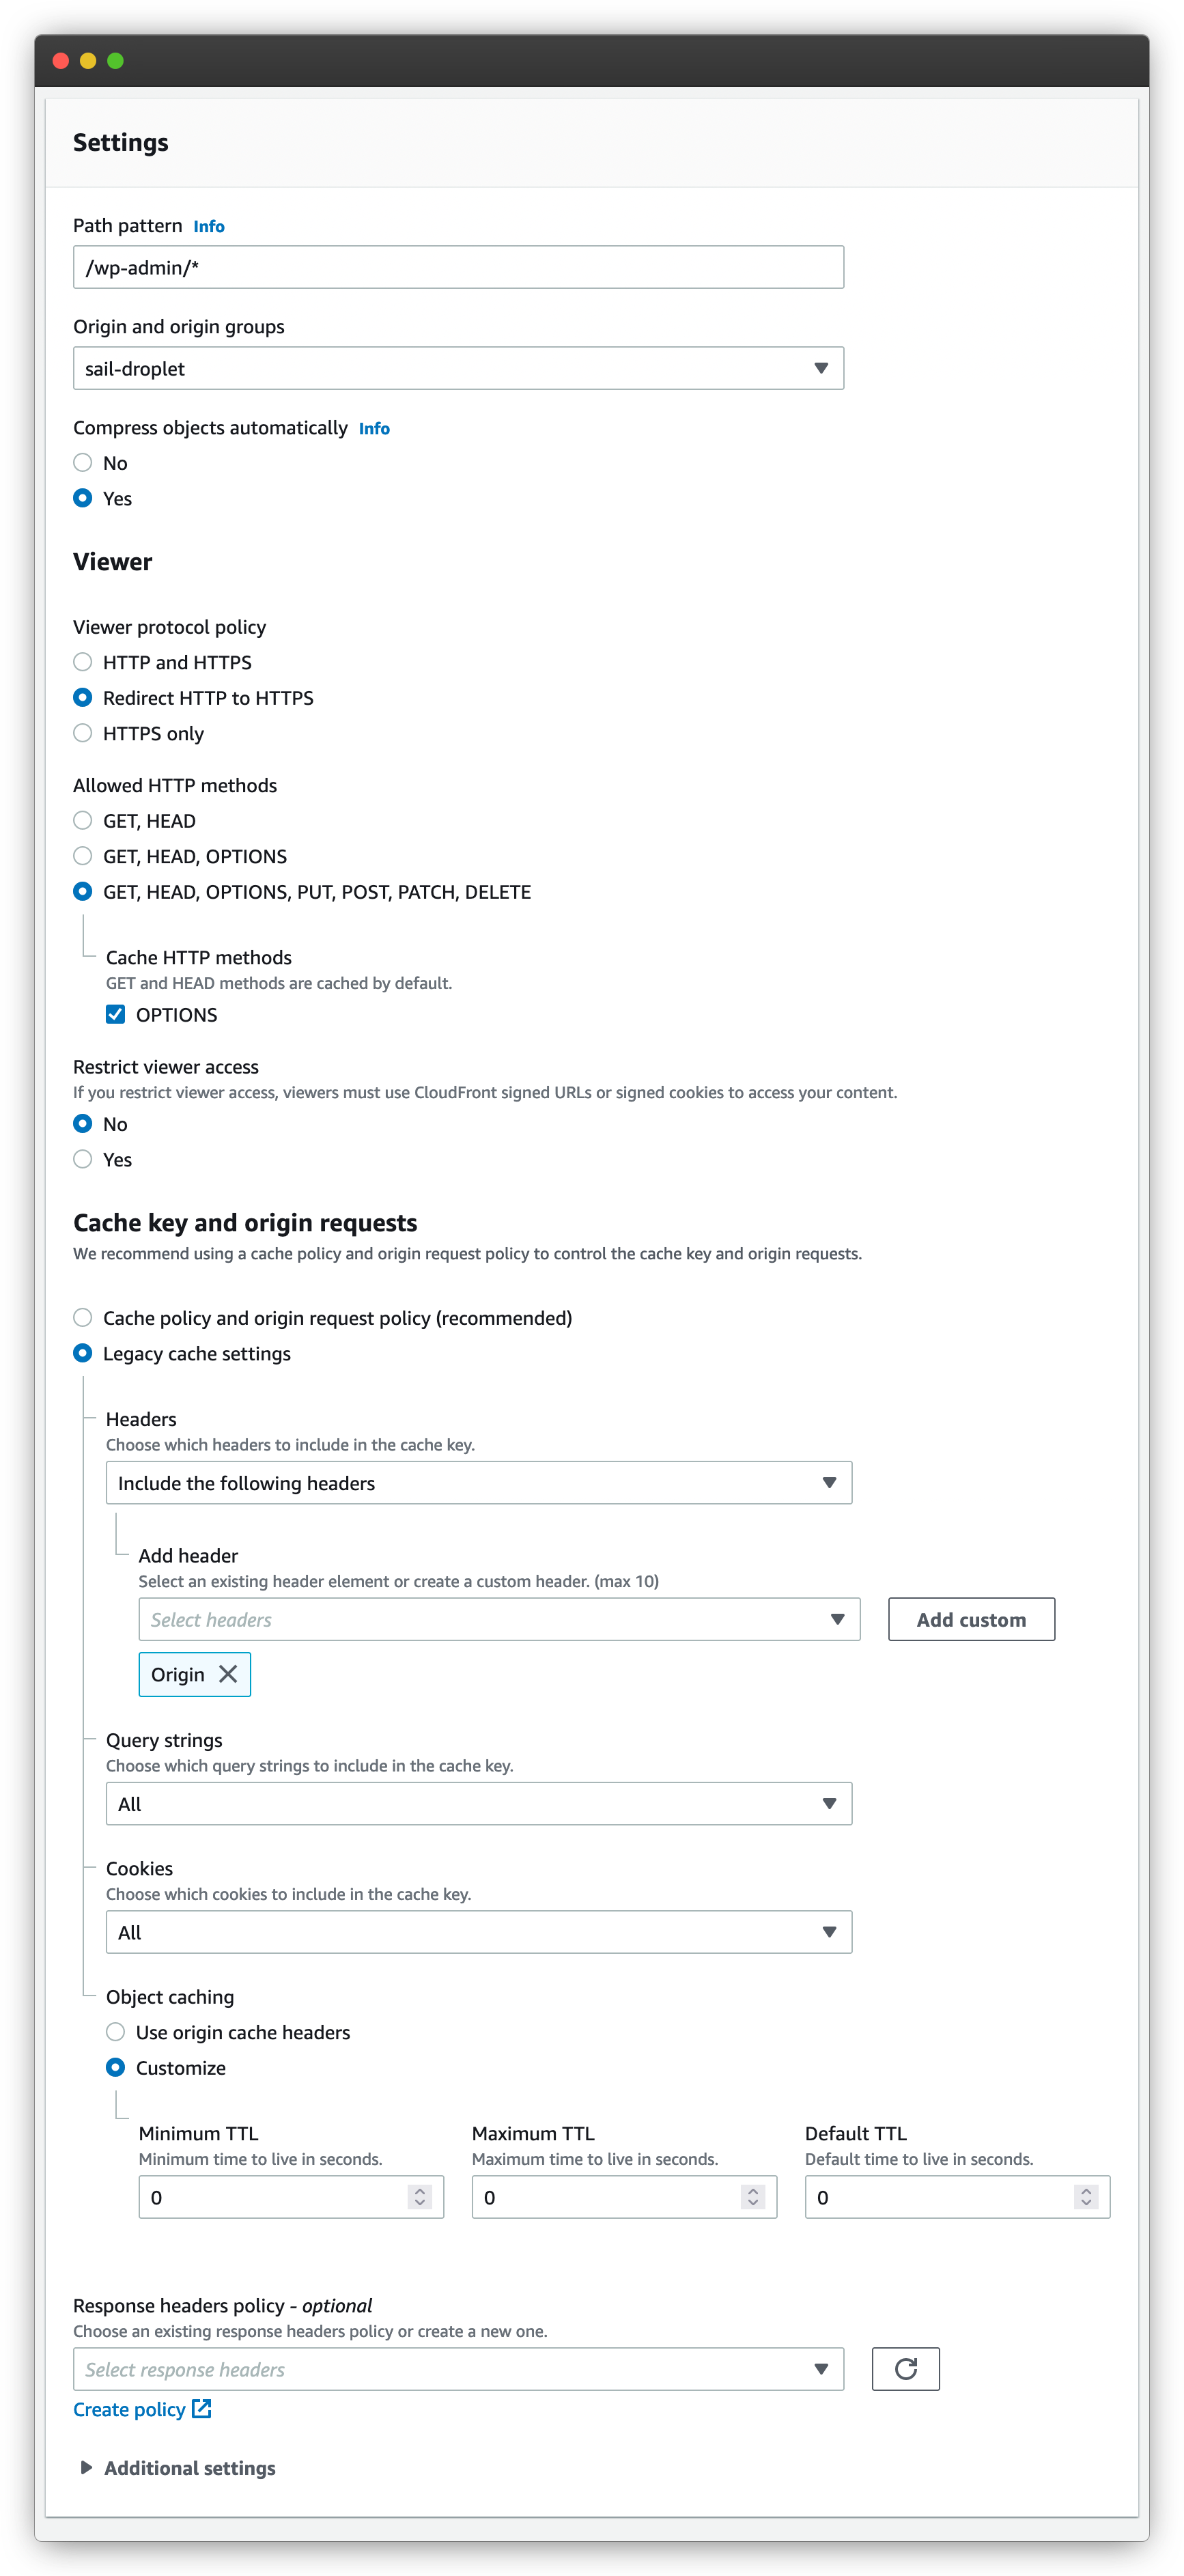
Never cache the WordPress admin pages
The second set of cache behaviors revolves around the WordPress admin. In no circumstance should you ever cache WordPress admin pages. So let’s look at how we do that.
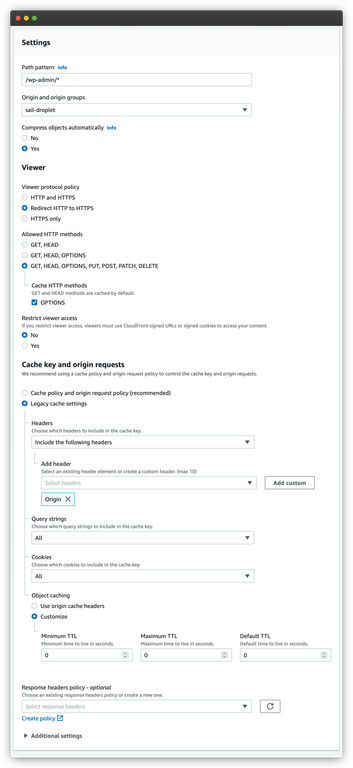
Above is the cache behavior for /wp-admin/*. This cache behavior is a lot closer to our default one. We go back to allowing all HTTP methods.
The cache is also very similar. We only use the origin header and all query strings to make the cache key. The difference is that we also use all cookies to generate the cache key.
The behavior to not cache any requests comes from the last section, where we set the minimum, maximum and default TTL values. We want to set all these values to zero. This prevents CloudFront from returning cached responses to these requests.
So that’s it for not caching responses for the WordPress admin! Next, you’ll want to create a second cache behavior for the /wp-login.php page as well. Once you’ve done this, you should have these five cache behaviors:
Switching over to our CloudFront CDN
At this point, we’re ready to use our CloudFront CDN with our Sail-managed droplet! You’ll want to go back to the General tab of your distribution configuration. There, you’ll want to look for the Distribution domain name.
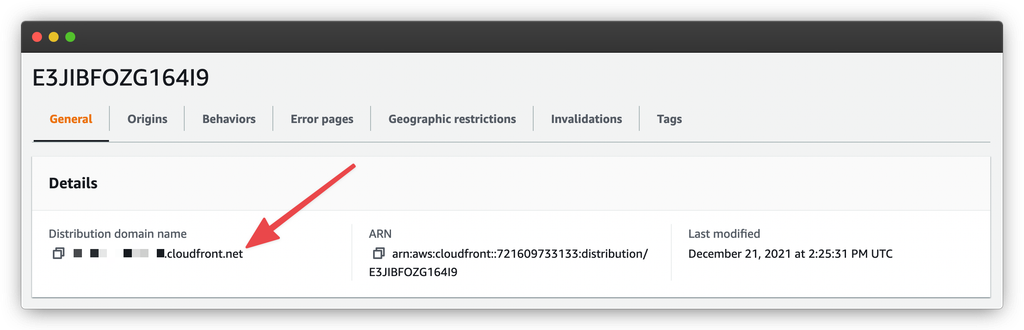
This is the {subdomain}.cloudfront.net domain name pointing to your CloudFront distribution. We’re going to configure our sail droplet to respond to it now. To begin, we’re going to run this command:
$ sail domain add {subdomain}.cloudfront.net --skip-dnsThis will add our distribution domain name to the list of domain names the droplet responds to. The --skip-dns flag removes the DNS management steps since sail doesn’t manage the cloudfront.net domain.
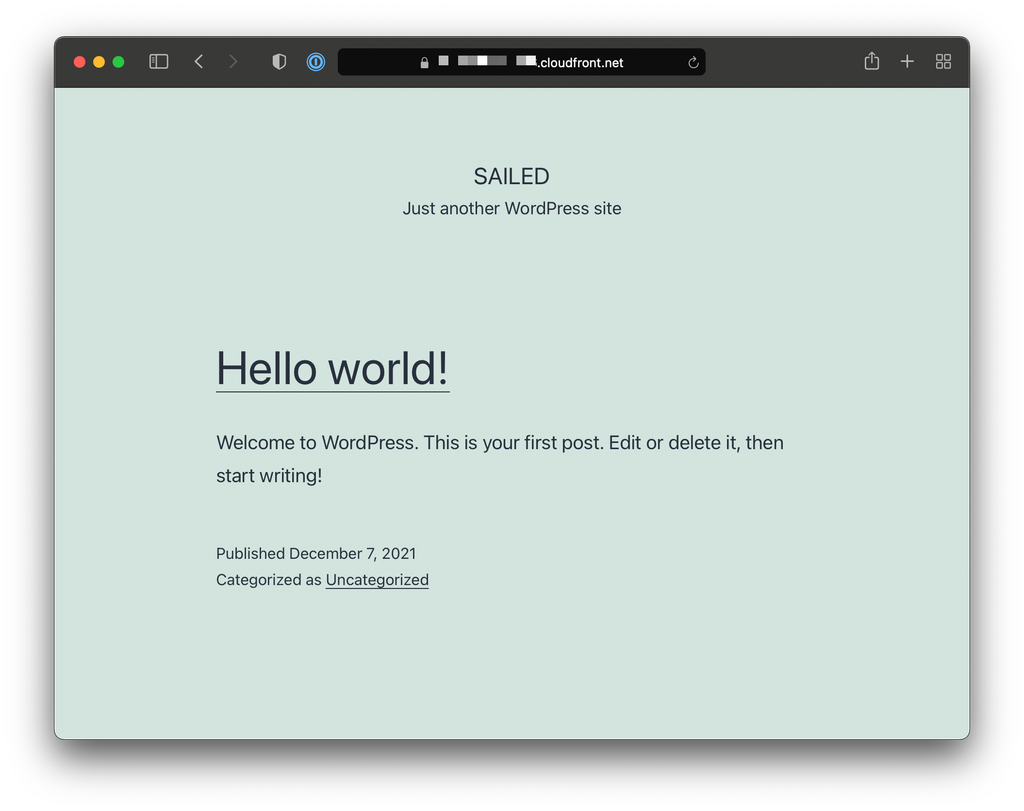
If you stop here, you’ll notice that your WordPress site still points to your justsailed.io vanity domain. We need to update WordPress to do that. Lucky for us, Sail has a command to do just that!
$ sail domain make-primary {subdomain}.cloudfront.netThis will update WordPress so that all the URLs point to our cloudfront.net domain. And that’s it! You should have a CloudFront powered WordPress site.
Using a real domain name
Ok, this is obviously nice. But no one wants to use a cloudfront.net domain! So how can you use your CloudFront domain with a real domain name?
Creating a SSL certificate
To be able to deliver content from a custom domain, CloudFront needs a SSL certificate for that domain. AWS has a service called AWS Certificate Manager (ACM) that handles this. To have ACM issue a certificate, go to the ACM console page and click Request.
There you’ll want to request a public certificate and go to the next page. On that page, you’ll enter the domain name for the certificate. You want to add *. to make it a wildcard certificate.
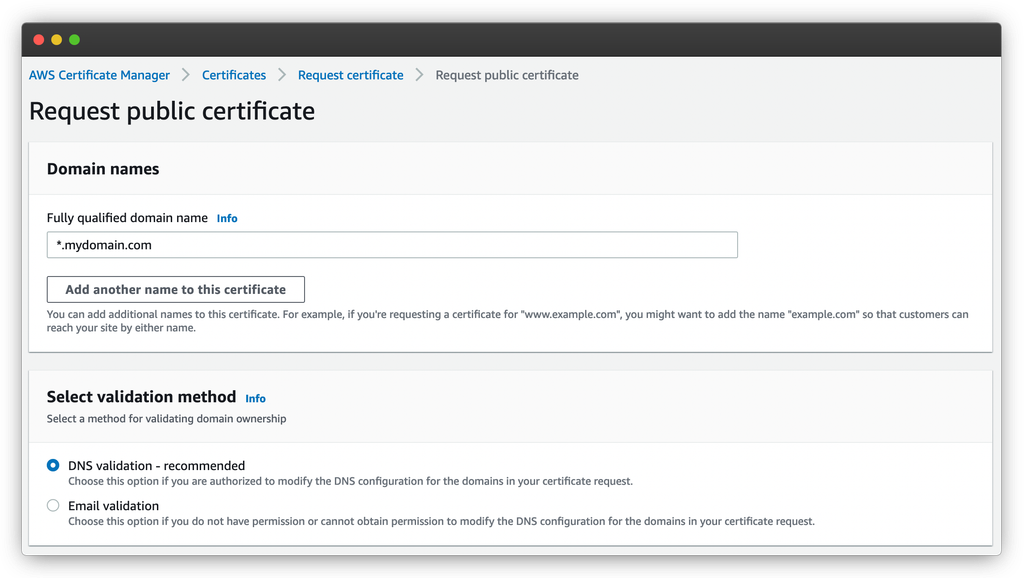
You can also choose the validation method. While email is an option, it’s not recommended. You should use DNS validation instead.
After that, you can press Request. This will bring you back to your certificate list where you’ll the new certificate is pending validation.
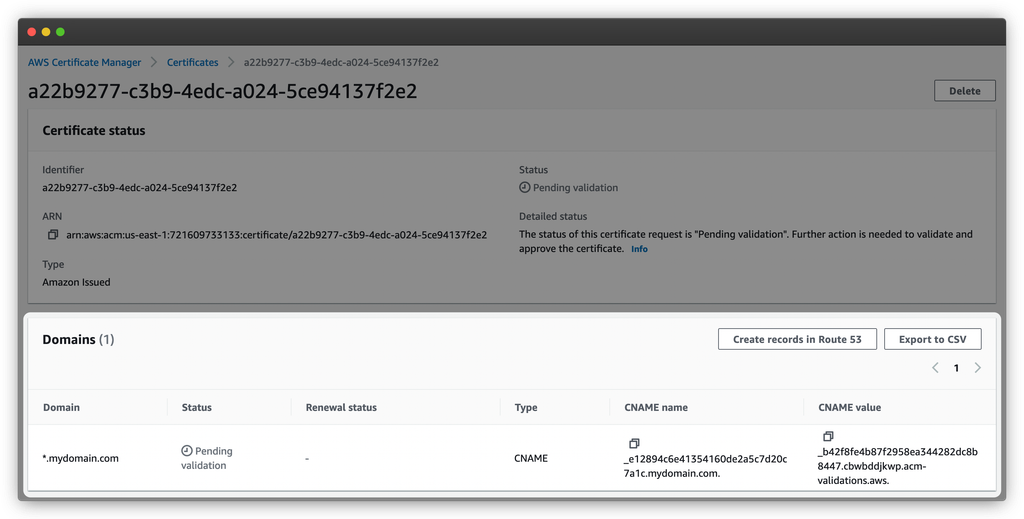
If you click on it to see the detail, you’ll get the screen shown above. There, you’ll see the DNS record that you need to add. Once the DNS record added, the SSL certificate should get issued within a few minutes.
Configuring CloudFront to use a custom domain
Next, we need to go back to our CloudFront distribution. You want to edit the distribution settings.
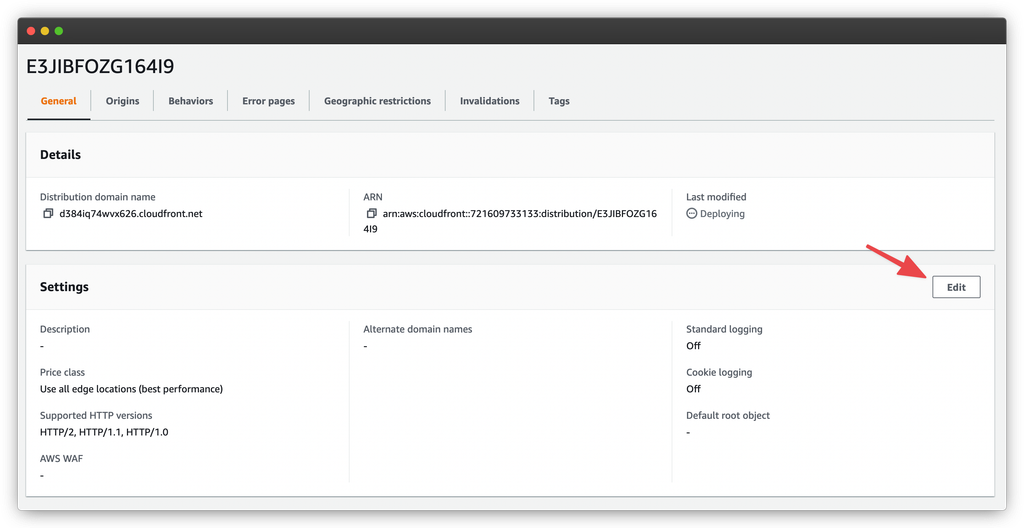
There, you’ll want to add the domain of the WordPress site. If you’ll want to support both the non-www and www domain name, you’ll need to add both.
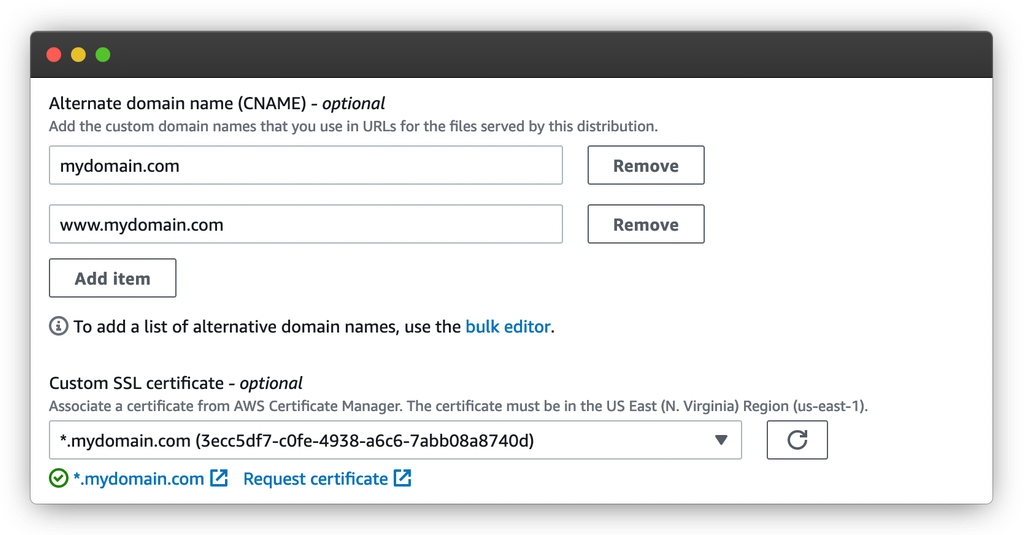
Next, select the certificate that you created in ACM. If it’s not showing up, it means that ACM hasn’t issued the certificate yet. Once you’re done, save your changes. It can take about 20 minutes for the changes to propagate.
Switching to the new domain
Last, we need to switch over to the new domain. First, you’ll need to point the DNS records to the CloudFront distribution. Below is how I set it up in Namecheap.
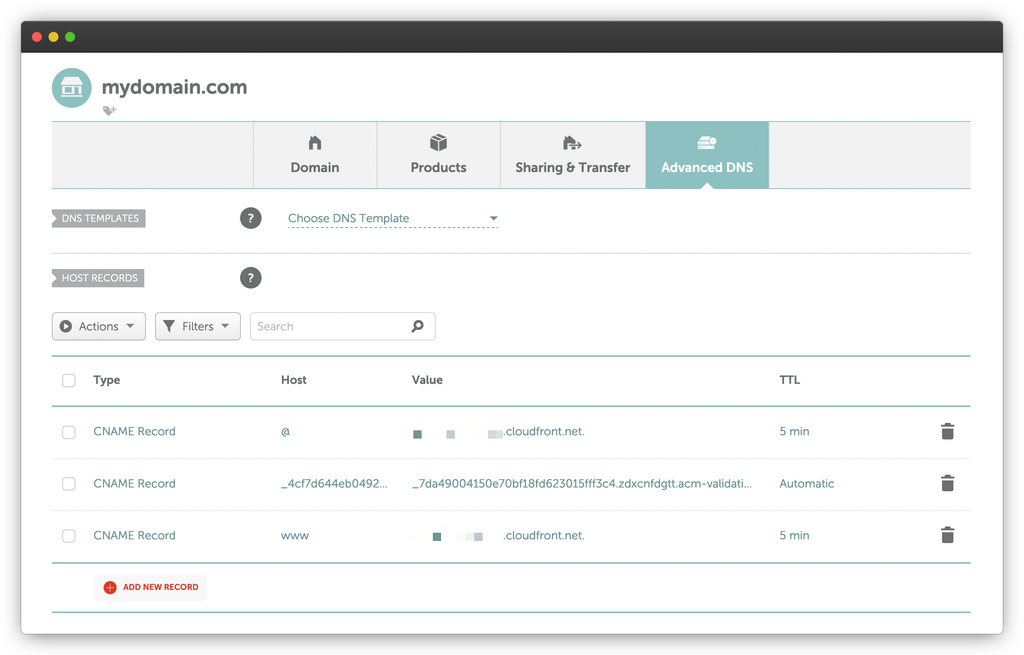
You want to use a CNAME record. I set it for @ which is the root record and www. You then have both records point to the CloudFront distribution domain that we used earlier.
After that, we need to have Sail update the primary domain of the WordPress site. You can use the same commands that we used earlier.
$ sail domain add mydomain.com --skip-dns
$ sail domain make-primary mydomain.com
A better page cache with some limitations
And that’s it! You’re done. You now have a geo-distributed page cache. You can enjoy 20ms response times from anywhere in the world. Sweet!
Now, there are limitations with this setup. There’s currently no plugin (besides the Ymir one) that can dynamically invalidate content in the CloudFront page cache.
Instead, you need to rely on the default cache time. You want a default cache time that allows you to feel like the WordPress site responds to changes, but long enough to cache meaningfully. For Ymir, prior to having dynamic cache invalidation, I’d decided on 5 minutes. (300 seconds)